Toyota Prius timing chain
For the 2010 Toyota Prius (both Gen II and Gen III models, with the 1.8 L 2ZR‑FXE hybrid engine), here are the official torque specifications and installation details for the timing chain and related components:
⚙️ Camshaft Timing Sprocket & Gear
From the 2ZR‑FXE engine manual:
- Inlet & exhaust camshaft sprocket flange bolts: 54 N·m (40 ft·lbf) (workshop-manuals.com, charm.li)
🔧 Timing Chain Tensioner
The tensioner assembly uses two bolts:
- Timing chain tensioner nuts: 12 N·m (9 ft·lbf)
Vibration Damper Bolt
For the No. 1 vibration damper that preloads the chain:
- Chain damper bolts: 21 N·m (15 ft·lbf) (scribd.com)
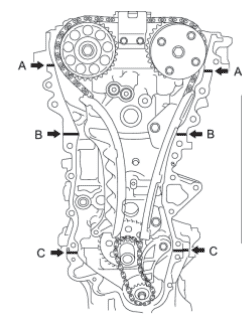
⛓️ Timing Chain Cover
Bolt torques vary by position:
- Bolts A, E, F: 26 N·m (19 ft·lbf)
- Bolts B, C: 51 N·m (38 ft·lbf)
- Bolt D: 10 N·m (7 ft·lbf) (charm.li)
📏 Bolt Torque Summary
| Component | Torque (N·m) | Torque (ft·lbf) |
|---|---|---|
| Cam sprocket flange bolts | 54 | 40 |
| Chain tensioner assembly nuts | 12 | 9 |
| Vibration damper bolts | 21 | 15 |
| Timing chain cover bolts (A,E,F / B,C / D) | 26 / 51 / 10 | 19 / 38 / 7 |
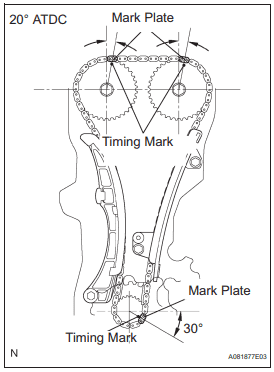
🔧 Installation Overview:
- Align cam sprockets and crank per factory match marks.
- Install chain vibration damper, torque to 21 N·m.
- Set tensioner plunger, then bolt the tensioner to 12 N·m.
- Secure the timing cover following the torque chart.
- Finish with the cam sprocket bolts torqued to 54 N·m.
🧰 Pro Tips & Community Notes
- The **tensioner is a common oil-seep point, though not always a failure; many Prius owners report mild seepage without needing full replacement (reddit.com, scribd.com, workshop-manuals.com, reddit.com, manualslib.com, reddit.com).
- Chain wear is uncommon—Prius timing chains are durable. A loose chain on inspection isn’t necessarily bad—tensioners often preload slack at first .
- If replacing the chain or tensioner, re-check timing marks carefully and torque bolts precisely as per the chart above.
📚 Additional Resources
- Factory torque specs from garage.wiki’s 2010 Prius engine guide (garage.wiki)
- Toyota workshop manual screenshots for sprocket and tensioner specs (workshop-manuals.com)
✅ Summary
For the 2010 Prius (2ZR‑FXE 1.8 L hybrid) timing chain assembly, the key torques are:
- Cam sprocket bolts: 54 N·m
- Tensioner nuts: 12 N·m
- Damper bolts: 21 N·m
- Timing cover bolts: 10–51 N·m by position
Proper bolt torque plus correct timing alignment ensures a reliable, smooth-running hybrid powertrain.
Toyota Prius 2010 timing chain manual PDF
Toyota Prius 2006 timing chain installation
Here’s a comprehensive guide for 2006 Toyota Prius (1NZ‑FXE 1.5 L hybrid, Gen I~II) timing chain installation, based on factory service manual specs and verified procedures:
🛠️ 1. Timing Chain Cover & Water Pump Bolts
Install evenly in several passes, following bolt length order:
| Bolt | Torque |
|---|---|
| A, C, E, G | 11 N·m (8 ft·lbf) |
| B, D, F | 24 N·m (18 ft·lbf) |
Additionally, after installing the cover, mounting bracket bolts: 55 N·m (41 ft·lbf) (workshop-manuals.com, charm.li).
- Cover installation must be completed within 3 minutes of applying sealant.
- Afterward, install the water pump and bracket within 15 minutes.
(id.scribd.com, workshop-manuals.com)
⛓️ 2. Chain Tensioner & Guide
- Tensioner/slipper bolt: 19 N·m (14 ft·lbf) (auto-master.su)
- Timing chain guide bolt (upper guide): 9 N·m (80 in·lbf) (auto-master.su)
🔧 3. Chain Vibration Damper & Oil Pump Sprocket
- Damper bolt: 9 N·m (80 in·lbf)
- Oil pump sprocket nut: 30 N·m (22 ft·lbf) (rotate crank +90° after) (justanswer.com)
🎛️ 4. Crankshaft Pulley & Sensor
- Crank pulley bolt: 128 N·m (94 ft·lbf) (workshop-manuals.com)
- Crank position sensor plate bolts: A: 7.5 N·m, B: 11 N·m (workshop-manuals.com)
✅ Installation Overview
- Align crank to TDC using crank key ▲ up.
- Fit the timing chain sub‑assembly: align colored link(s) to cam/crank sprocket marks.
(tcamanual.com) - Install oil pump sprocket and torque nut to 30 N·m, then rotate crank 90°.
(charm.li) - Fit tensioner slug/slipper guide—torque bolts: guide 9 N·m, tensioner 19 N·m.
(auto-master.su) - Mount vibration damper at 9 N·m.
- Install chain cover + pump, torque bolts per chart.
- Bolt down crank pulley to 128 N·m, then reinstall sensor and bracket at appropriate torques.
🧠 Special Notes
- After sealant is applied, all components must be installed within strict time frames to avoid seal failure.
(workshop-manuals.com, workshop-manuals.com) - Retain proper chain tension by supporting backlash on tensioner side.
- Rotate engine at least two full turns by hand to check timing marks realign & tensioner resets properly.
🧾 Summary Table
| Component | Torque |
|---|---|
| Cover bolts A, C, E, G | 11 N·m (8 ft·lbf) |
| Cover bolts B, D, F (incl. nut F) | 24 N·m (18 ft·lbf) |
| Mounting bracket | 55 N·m (41 ft·lbf) |
| Tensioner/slipper bolt | 19 N·m (14 ft·lbf) |
| Guide bolt | 9 N·m (80 in·lbf) |
| Chain damper bolt | 9 N·m (80 in·lbf) |
| Oil pump sprocket nut | 30 N·m + 90° turn |
| Crank pulley | 128 N·m (94 ft·lbf) |
| Sensor plate bolts A/B | 7.5 / 11 N·m |