Repairing a Toyota Corolla head gasket can range from a medium-level DIY project to a full professional engine job — depending on your tools, skills, and the model/year of the Corolla.
Below is a clear, mechanic-style guide with the steps, tools, torque specs, and tips that apply to most modern Corolla engines (1ZZ-FE, 2ZR-FE, and similar).
1. Symptoms of a Blown Head Gasket
Before diving in, confirm it’s actually the gasket:
- White exhaust smoke (coolant burning).
- Overheating / coolant loss with no visible leak.
- Bubbles in the radiator or overflow.
- Oil contaminated with coolant (milky color).
- Coolant contaminated with oil.
- Compression loss on one or more cylinders.
2. Tools & Supplies
Tools:
- Full metric socket set (8–19 mm) + torque wrench (inch-lb and ft-lb ranges).
- Breaker bar, extensions, swivel joint.
- Screwdrivers & pliers.
- Gasket scraper or plastic razor blades.
- Engine hoist optional (for easy head handling).
- Feeler gauges & straight edge (to check head warp).
- Drain pans, shop rags.
Parts & consumables:
- OEM head gasket set (includes valve cover, intake, exhaust, cam seals, etc.).
- New head bolts (most Toyota engines use torque-to-yield bolts — do not reuse).
- Engine oil + filter.
- Coolant.
- RTV silicone (Toyota FIPG for corners).
- Brake cleaner / degreaser.
3. Preparation
- Park on level ground, disconnect negative battery cable.
- Drain coolant and oil.
- Label & disconnect all wiring harnesses, hoses, and fuel lines attached to the head.
- Remove air intake assembly, exhaust manifold heat shield, and accessory drive belts.
- Remove timing cover and set engine to Top Dead Center on cylinder #1.
4. Disassembly Steps
- Remove valve cover.
- Remove timing chain/belt (depends on year — most post-2003 Corolla use a chain).
- Unbolt camshaft caps and remove camshafts.
- Remove intake & exhaust manifolds (can be done on engine or after head removal).
- Loosen head bolts in reverse torque sequence to prevent warping (outer to inner).
5. Head Removal & Inspection
- Lift cylinder head straight up — avoid prying against sealing surfaces.
- Remove old gasket and clean block surface with a plastic scraper — avoid gouging aluminum.
- Check head with straight edge & feeler gauge — Toyota spec usually max warp 0.05 mm (0.002″) across length/width. If warped, resurface at a machine shop.
- Inspect for cracks (especially between valves) — pressure test if possible.
6. Installation
- Clean head bolt holes in block — blow out with compressed air.
- Place new head gasket on block, aligned with dowels (metal side up if one side is coated).
- Carefully lower head onto block — align dowels.
- Install new head bolts, lubricating threads with light oil.
7. Torque Specs (example: 1ZZ-FE engine)
(Always check your Corolla’s exact FSM — values vary by year/engine)
Head bolts:
- Step 1: Torque all bolts to 36 ft-lb in sequence.
- Step 2: Tighten all bolts an additional 90°.
- Step 3: Tighten all bolts an additional 90° again.
Tightening sequence: start in center, work outwards in spiral pattern.
8. Reassembly
- Reinstall camshafts, torque cam caps to spec (~12–14 ft-lb).
- Install timing chain/belt & set timing marks correctly.
- Refit manifolds, torque to spec (intake ~15–21 ft-lb, exhaust ~27–30 ft-lb).
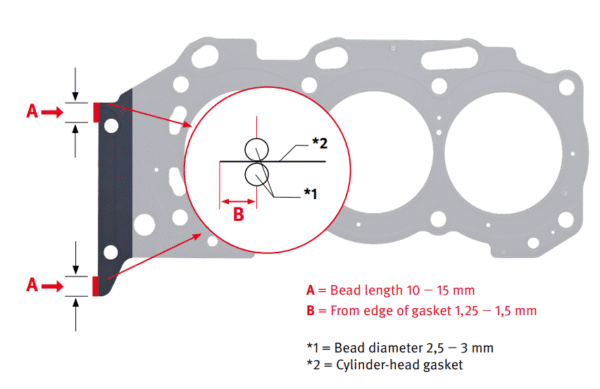
- Install valve cover with new gasket + RTV in timing cover corners.
- Reconnect wiring, hoses, and accessories.
- Fill with fresh oil & coolant.
9. First Start & Break-in
- Start engine, let idle until warm — check for leaks.
- Bleed cooling system (Toyota uses a high fill point — keep heater on HOT).
- Re-torque if FSM specifies (most torque-to-yield bolts do not require re-torque).
- After ~500 km (300 mi), check oil/coolant levels again.
10. Cost & Time Estimates
- DIY parts: $150–$400.
- Machine shop head resurfacing: $60–$150.
- Labor (shop): $900–$1,600+ depending on model.