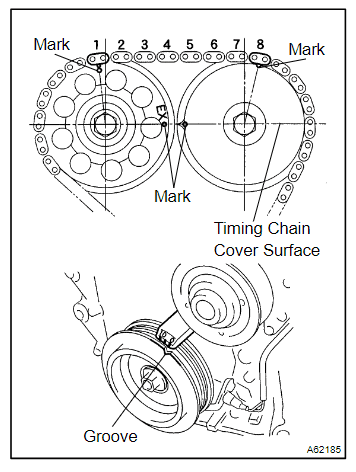
Toyota Corolla front suspension diagram
Toyota Corolla front suspension diagram
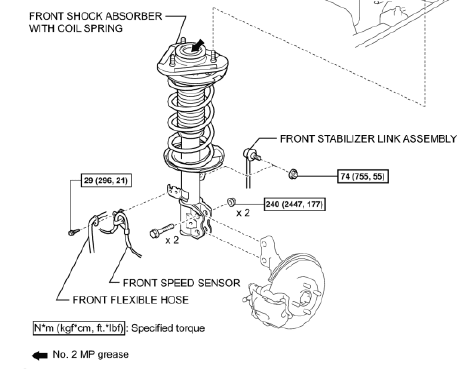
Corolla Front Suspension Troubleshooting and Installation
The front suspension in a Toyota Corolla plays a critical role in handling, comfort, and safety. Understanding how to diagnose and install components can help ensure optimal performance and reliability.
Troubleshooting Front Suspension Issues
Common Symptoms of Suspension Problems:
- Unusual Noises:
- Clunking or squeaking noises when driving over bumps could indicate worn bushings, ball joints, or struts.
- Steering Difficulties:
- Excessive play, stiffness, or vibration in the steering wheel may stem from worn tie rods or misalignment.
- Uneven Tire Wear:
- Caused by misalignment, damaged control arms, or worn suspension components.
- Vehicle Pulls to One Side:
- Indicates alignment issues, bad struts, or uneven tire pressure.
- Rough Ride:
- Worn shocks or struts can reduce the suspension’s ability to absorb impacts.
Diagnosis Steps:
- Visual Inspection:
- Inspect control arms, ball joints, struts, and bushings for wear, cracks, or damage.
- Check for Play:
- Lift the car and manually check for excessive play in tie rods and ball joints.
- Listen for Noises:
- Test-drive to identify noises during turning or going over bumps.
- Check Alignment:
- Misaligned wheels indicate worn or damaged suspension components.
- Test Struts/Shocks:
- Press down on each corner of the car. If it bounces more than twice, the shocks or struts may need replacement.
Front Suspension Component Installation
Tools Required:
- Jack and jack stands
- Socket set and wrenches
- Torque wrench
- Ball joint separator
- Pry bar
General Steps:
- Lift and Secure the Vehicle:
- Use a jack to lift the vehicle and secure it with jack stands.
- Remove the front wheels.
- Remove the Faulty Component:
- For control arms: Detach ball joints and control arm bolts.
- For struts: Remove the top mount bolts, disconnect the lower mounting bolts, and carefully remove the strut assembly.
- For tie rods: Detach the outer tie rod end from the steering knuckle.
- Install the New Component:
- Align and mount the replacement part in reverse order of removal.
- Tighten bolts to manufacturer-specified torque values.
- Reassemble and Test:
- Reinstall wheels and lower the car.
- Perform a test drive to ensure proper installation.
Precautions
- Alignment Check: After any suspension repair, have the wheel alignment checked and adjusted as necessary.
- Use OEM Parts: Use Toyota-certified parts for better compatibility and durability.
- Torque Specifications: Always refer to the service manual for proper torque settings.
Additional Resources
- Toyota Service Manual:
- Provides step-by-step instructions for specific model years.
- Available at Toyota TIS.
- Repair Forums:
- Websites like Toyota Nation and Corolla forums often provide user experiences and tips.
- YouTube Tutorials:
- Search for model-specific videos for visual guidance.