Toyota Camry oil consumption fix

The Toyota 2AZ-FE engine, used in models like the Toyota Camry, RAV4, and Scion tC (2007-2011), is known for excessive oil consumption, especially as the engine ages. This issue is typically caused by worn piston rings, which allow oil to bypass and burn in the combustion chamber.
Here’s an overview of the repair procedure to address excessive oil consumption in the 2AZ-FE engine.
Toyota Corolla oil consumption – Toyota Camry Rav4 Scion ..
Toyota 2AZ FE Engine Oil Consumption Repair Procedure
1. Diagnosis
Before beginning repairs, it’s essential to confirm that the engine is consuming oil due to worn piston rings and not due to external oil leaks or other issues like a faulty PCV valve.
- Check for leaks: Inspect the valve cover, oil pan, and other seals for oil leaks.
- Compression test: Conduct a compression test to check the health of the piston rings and cylinders.
- Oil consumption test: Track oil levels over several hundred miles to confirm the rate of consumption.
2. Parts and Tools Needed
- Parts:
- New piston rings
- Pistons (if needed)
- Cylinder head gasket
- Timing chain cover gasket
- Oil pan gasket
- Valve cover gasket
- Oil control valve seals
- Crankshaft front and rear oil seals
- Engine oil and filter
- Coolant
- Timing chain (if stretched or worn)
- Tools:
- Socket and wrench set
- Torque wrench
- Engine hoist (if removing the engine from the vehicle)
- Piston ring compressor
- Cylinder honing tool (if needed)
- Gasket scraper
3. Disassembly Process
a. Remove Engine Components
- Disconnect the battery to prevent electrical shorts.
- Drain the engine oil and coolant.
- Remove the intake manifold, exhaust manifold, and engine accessories (alternator, power steering pump, etc.).
- Remove the valve cover and timing chain cover.
- Disconnect the timing chain from the camshaft and crankshaft.
- Remove the cylinder head by unbolting it in the correct sequence.
b. Remove the Pistons
- Remove the oil pan to access the crankshaft and connecting rods.
- Unbolt the connecting rod caps and carefully push the pistons and connecting rods out of the cylinders from the bottom of the engine.
4. Piston and Piston Ring Inspection
- Inspect the pistons for wear or damage. Replace if necessary.
- Check the cylinder walls for scoring. If the walls are excessively worn or scratched, you may need to hone or resurface the cylinders, or in severe cases, replace the engine block.
- Remove the old piston rings and inspect the pistons for carbon buildup. Clean the ring grooves thoroughly.
5. Install New Piston Rings
- Install the new piston rings onto the pistons. Be careful to follow the manufacturer’s instructions on the correct orientation and stagger the ring gaps around the piston to avoid oil blow-by.
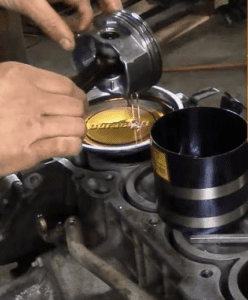
- Use a piston ring compressor to compress the rings as you install the pistons back into the cylinders.
6. Reassemble the Engine
a. Install the Pistons and Connecting Rods
- Carefully insert the pistons into the cylinders using a ring compressor. Make sure to align the connecting rods with the crankshaft.
- Install the connecting rod caps and torque the bolts to the manufacturer’s specifications.
b. Reinstall the Cylinder Head
- Install a new head gasket and carefully reinstall the cylinder head, torquing the head bolts in the correct sequence and to the specified torque values.
c. Reinstall Timing Chain and Valve Cover
- Reattach the timing chain and ensure proper alignment of the camshaft and crankshaft.
- Reinstall the valve cover with a new gasket.
d. Reinstall Oil Pan and Other Components
- Reattach the oil pan with a new gasket, and reinstall the exhaust manifold, intake manifold, and all other engine accessories.
- Refill the engine with fresh oil and coolant.
7. Test and Break-In
- Start the engine and check for any leaks or unusual noises.
- Monitor oil levels closely for the next few hundred miles to ensure the problem has been resolved.
- If new rings or pistons have been installed, follow the manufacturer’s recommended break-in procedure, which typically involves moderate driving for the first 500-1000 miles without heavy acceleration or high RPMs.
Additional Notes:
- PCV Valve Check: The Positive Crankcase Ventilation (PCV) valve can also contribute to oil consumption if clogged or faulty. It’s a good idea to replace it during this repair process.
- Warranty Coverage: If your vehicle is covered by Toyota’s Extended Warranty Program for oil consumption issues, some models may qualify for a free repair or partial coverage. Contact your Toyota dealer for details.
- Professional Help: If you’re not experienced with engine repairs, it’s recommended to have a professional mechanic perform this job, as it is labor-intensive and requires precise assembly.
By following this repair procedure, you should be able to significantly reduce or eliminate excessive oil consumption in the Toyota 2AZ-FE engine.
Toyota Camry oil consumption fix PDf
2AZ Engine Oil Consumption Repair Procedure: Toyota Camry – Corolla – RAV4 – Matrix – Solara

