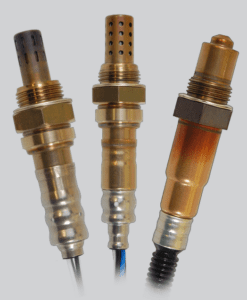
O2 sensor socket Toyota Corolla

To replace or service the O2 (oxygen) sensor in a Toyota Corolla, an O2 sensor socket or O2 sensor wrench is typically used. Here’s what you need to know:
Recommended O2 Sensor Socket for Toyota Corolla
- Size: Most Toyota Corollas use a 7/8-inch (22mm) O2 sensor socket, which is standard for most O2 sensors.
- Style: Choose a slotted or offset O2 sensor socket. This style has a cut-out for the sensor wire to pass through, allowing you to remove and install the sensor without damaging the wiring.
- Drive Size: A 3/8-inch or 1/2-inch drive is commonly used, depending on the socket design and your ratchet or breaker bar.
Types of O2 Sensor Sockets
- Standard slotted O2 sensor socket: For tight spaces, commonly used in Corollas.
- Offset O2 sensor socket: Provides a bit more leverage in difficult-to-reach areas, which can be helpful for sensors that are stubborn or corroded.
- Crowsfoot O2 sensor wrench: Useful for even tighter spaces if clearance is limited.
Tips for Removing O2 Sensors
- Use penetrating oil on the threads of the sensor if it’s tough to remove.
- Disconnect the battery before working to avoid electrical issues.
- Warm up the engine briefly before removal (not too hot, as it can damage tools and be dangerous).
o2 sensor 2006 Toyota Corolla
The 2006 Toyota Corolla typically has two O2 sensors:
- Upstream (Front) O2 Sensor: Located in the exhaust manifold, close to the engine, and monitors the oxygen levels in the exhaust gases before they reach the catalytic converter. It helps the engine control module (ECM) adjust the air-fuel ratio for optimal combustion.
- Downstream (Rear) O2 Sensor: Positioned after the catalytic converter, it monitors the oxygen levels post-catalytic converter to ensure it’s working efficiently in reducing emissions.
The oxygen (O2) sensor in your Toyota Corolla monitors exhaust gases to help manage fuel injection, emissions, and engine performance. If your Corolla’s O2 sensor is failing, you might notice a few common symptoms and error codes. Here’s how to troubleshoot and replace it:
Symptoms of a Faulty O2 Sensor
- Check Engine Light (CEL): A common indicator that the O2 sensor might be faulty.
- Poor Fuel Economy: A failing O2 sensor may cause the engine to burn more fuel than necessary.
- Rough Idle or Hesitation: The engine may hesitate, idle roughly, or even stall due to incorrect air-fuel ratio readings.
- Failed Emissions Test: A faulty O2 sensor often causes emissions to rise, leading to potential test failure.
- Pungent Exhaust Odor: Poor combustion due to incorrect air-fuel mixture may lead to a strong smell from the exhaust.
Troubleshooting Steps
- Check Engine Light Codes:
- Use an OBD-II scanner to check for codes. Common O2 sensor-related codes include P0130-P0135 (sensor circuit malfunction or heater circuit issues).
- Inspect Sensor Wiring:
- Visually check the wiring and connectors for damage, corrosion, or loose connections.
- Test with a Multimeter:
- Measure the sensor’s voltage output and resistance to verify if it’s within the expected range. Typically, the upstream sensor (closest to the engine) should fluctuate between 0.1 to 0.9 volts as it reads the exhaust gases.
- The downstream sensor (after the catalytic converter) should have a more stable reading, indicating it’s monitoring the converter’s efficiency.
- Check for Exhaust Leaks:
- A leak upstream of the O2 sensor can cause false readings, so inspect the exhaust manifold and pipes.
Replacement Guide
Note: Make sure you have a new O2 sensor compatible with your Corolla’s model and year. There are typically two sensors: upstream (before the catalytic converter) and downstream (after the catalytic converter).
Tools Needed
- O2 sensor socket (usually 7/8 inch or 22mm)
- Ratchet wrench (3/8 or 1/2 inch)
- Penetrating oil (optional for rusted sensors)
- Anti-seize compound (optional, for easier removal in the future)
- Gloves and safety goggles
Step-by-Step Replacement
- Ensure the Engine is Cool: Allow the engine to cool down completely to avoid burns.
- Disconnect the Battery: This will prevent any electrical issues while working on the sensor.
- Locate the O2 Sensor:
- Upstream sensor: This is located on the exhaust manifold or close to the engine.
- Downstream sensor: This is found after the catalytic converter, underneath the vehicle.
- Unplug the Sensor Connector:
- Locate the wiring harness for the sensor and disconnect it.
- Loosen and Remove the Sensor:
- Spray penetrating oil if the sensor is rusted or stuck.
- Use the O2 sensor socket to loosen and remove it by turning counterclockwise.
- Install the New Sensor:
- Apply a small amount of anti-seize compound to the threads (if not pre-applied), but be cautious not to get any on the sensor tip.
- Screw in the new sensor by hand first, then use the socket to tighten securely, but avoid over-tightening.
- Reconnect the Sensor Harness and Reconnect the Battery.
- Clear the Error Codes:
- Use the OBD-II scanner to clear any error codes and reset the Check Engine Light.
- Test Drive: Run the engine and take the car for a test drive to ensure the Check Engine Light does not reappear and that the car runs smoothly.
Additional Tips
- If you’re not comfortable with DIY repairs or have trouble accessing the sensor, consider having a professional handle the replacement.
- Replace O2 sensors in pairs if your vehicle has high mileage, as it can prevent future issues and balance sensor readings.
With a new O2 sensor, your Toyota Corolla should regain optimal performance, fuel efficiency, and emissions control.
