Fog light lamp kit Toyota Aygo
Fog light lamp kit Toyota Aygo 2008
Toyota Aygo Fog light lamp kit installation
Installing a fog light lamp kit on a Toyota Aygo is a straightforward process that can improve driving visibility in foggy or low-light conditions. Here’s a guide on how to install a fog light kit on the Toyota Aygo:
Tools and Materials Needed
- Fog light kit for Toyota Aygo (includes fog lights, wiring harness, switch, and mounting brackets)
- Screwdrivers (Phillips and flathead)
- Socket wrench set
- Electrical tape
- Trim removal tool (optional)
- Zip ties
- Wire connectors or splicing tools
StepS 1: Preparation
- Disconnect the Battery: To avoid electrical hazards, disconnect the negative terminal of the battery.
- Inspect Kit Components: Confirm that all necessary parts are included in your fog light kit—lamps, brackets, wiring, relay, and switch.
2: Access the Fog Light Locations
- Remove Fog Light Covers or Grilles: If your Aygo has blank panels where the fog lights go, remove these by carefully prying them off with a trim tool or screwdriver.
3: Install the Fog Lights and Brackets
- Position the Brackets: Place the fog light brackets in the designated slots behind the grille or bumper.
- Mount the Fog Lights: Secure the fog lights to the brackets with the screws provided. Ensure they are correctly aligned to prevent glare and ensure visibility.
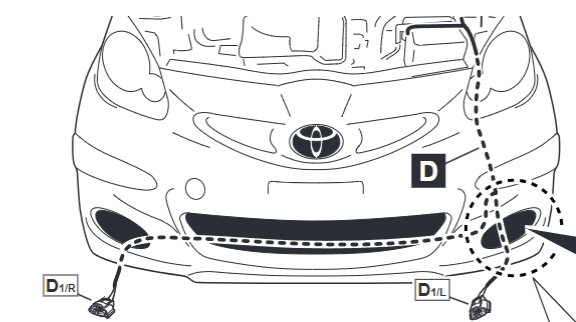
4: Route the Wiring Harness
- Connect Wiring to Fog Lights: Attach the wiring harness connectors to each fog light. Make sure each connection is secure.
- Run the Wires: Route the wiring harness toward the engine bay and battery. Keep wires away from moving parts, heat sources, and sharp edges.
5: Install the Relay and Fuse
- Locate the Fuse Box: Open the fuse box in the engine compartment or under the dashboard (based on your Aygo model).
- Install the Relay: Insert the relay into the designated slot as per the fog light kit’s instructions.
- Check the Inline Fuse: Make sure the inline fuse is installed correctly in the fog light circuit.
6: Install the Switch
- Mount the Switch in the Cabin: Find a suitable location on the dashboard for the fog light switch. You may need to drill a small hole for mounting.
- Run the Wires to the Switch: Connect the switch wiring to the fog light harness and run it through the firewall into the cabin.
7: Connect to the Battery
- Positive Wire Connection: Attach the positive wire from the harness to the positive terminal of the battery.
- Ground Wire Connection: Connect the ground wire from the harness to a metal surface near the battery or to the frame of the vehicle.
8: Test the Fog Lights
- Reconnect the Battery: Reattach the negative terminal to the battery.
- Switch on the Fog Lights: Test the switch to ensure the fog lights turn on properly. Check for correct alignment and adjust if needed.
9: Secure and Organize Wiring
- Tidy Up Wires: Use zip ties to secure any loose wires and keep them from dangling or interfering with other components.
10: Reinstall Grilles or Covers (if applicable)
- Replace any Trim or Covers: If applicable, reattach any panels or covers removed for installation.
Final Tips
- Double-Check Alignment: Proper fog light alignment ensures they won’t blind oncoming traffic.
- Follow Local Laws: Fog light usage is regulated in some areas, so ensure compliance with your local laws.
This setup will improve visibility and give your Toyota Aygo a practical upgrade.